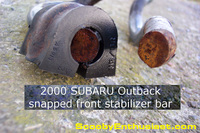
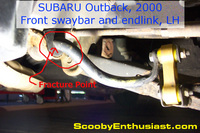
There are a number of reports on the soob boards of broken or fractured or snapped front sway bars on 2000 Outbacks. It also snapped on my 2000 Outback when the tire dropped off a low curb.
Symptoms of SUBARU broken stabilizer bar
 One sign of the front sway bar fracturing, breaking, or snapping is a sudden loud BANG sound, almost like a gunshot, especially when hitting a pothole or bump. The break often occurs when hitting a bump or pothole because the stress on the bar is greatly increased at this time. So any weak point is more likely to give under the high stress.
Another sign can then be a rubbing or metallic sound when making turns. When my sway bar broke and I heard the gunshot sound, I looked under the vehicle but didn't immediately notice anything odd. However there was now a clanking sound when making sharp right turns. I later found out that sound was the broken end of the sway bar flopping around and rubbing against the tire.
<> echo dioGetRotate('repairinfo1_728','j'); ?>
SUBARU broken sway bar identification
 The broken or snapped sway bar can be spotted by looking underneath the front of the vehicle and inspecting the sway bar and endlinks. If you're willing to get a little dirty, this inspection can be done without lifting the vehicle thanks to the Outback's ground clearance.
Broken sway or stabilizer bar replacement on a SUBARU
The sway bar is relatively easy to replace.
- The front of the vehicle was lifted and set on jackstands.
- The engine underdoor was removed to allow access. (Not all SUBARU models have the underdoor.)
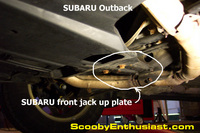
 The jack up plate was removed. The jack up plate might not have needed to be removed, but the FSM (factory service manual) showed to remove it so I removed it. Some of the nuts for the jack up plate are a little tricky to get at as they are kind of buried.
- Then the nuts and bolts securing the stabilizer / sway bar end links were removed. The clamps that hold the sway bar bushings were also removed. The old sway bar was easy to remove with one end snapped off.
- The new stabilizer bar was put into place from the RH (right-hand) side of the vehicle. Snaking the sway bar through is a little tricky because of the power steering lines in the vicinity. Turning/rotating the bar clockwise/counterclockwise whilst feeding it through helps it clear the obstructions. The exhaust did not need to be dropped to replace the sway bar.
- The new sway bar bushings were put on the new sway bar, and the bushing clamps were reinstalled. New self-locking nuts were used. No fasteners were tightened more than finger tight at this point. The FSM says to torque the fasteners only after the tires are on the ground.
- After the vehicle was taken off the jackstands, a 3/8" drive torque wrench was used to tighten the nuts to the appropriate torque. It is a little difficult to work under the vehicle without it lifted, but not impossible. Another option might be to do the repair with the vehicle driven up onto ramps.
Did your SUBARU front sway bar fracture or break? Please feel free to post a comment below, or visit the SUBARU repair forum.
About the Author
This article was written by Lewis Werner. It was last updated June 10, 2011 and first published November 15, 2010. If you have questions about the article, please click here to view the author's contact information including e-mail address, telephone number and mailing address.
Post new comment